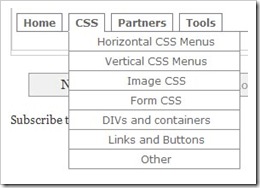
 From this tutorial, you will be able to add a multi-level navigation bar to the header of your Blogger powered blog. The entire interface is rendered in plain HTML, enabling this script to be easily customized to fit your Blogger template and allow all of its content to be search engine friendly. You can also set which tab you want to be selected by default when the page loads (ie. 1st, 2nd, 3rd tab, etc.), or have the script automatically select a tab based on a match between the current page’s URL and one of the menu tabs’. If there is a match then that tab will be selected. Before attempting this tutorial, make sure you back up your current template in case it doesn’t turn out as expected.
Click here to see the demo page
Steps to follow:
1. Login to your Blogger Dashboard and select the Layout tab > Edit HTML (do not click on “Expand Widget Template”)
2. Hold CTRL+F and find the following section code: <div id='main-wrapper'>
3. Once you’ve located this code, right underneath it should have the following section code: <b:section class='main' id='main' showaddelement='no'>
<b:widget id='Blog1' locked='false' title='Blog Posts' type='Blog'/>
</b:section>
</div>
4. You will need to modify the showaddelement to “yes” and the locked to “true”, so it will look like this:
<b:section class='main' id='main' showaddelement='yes'>
<b:widget id='Blog1' locked='true' title='Blog Posts' type='Blog'/>
</b:section>
</div>
5. Once you’ve modified your section code, hold CTRL+F and locate the following section code: ]]></b:skin>
6. Paste the following section code right underneath it: <script src='http://www.blogspotvision.com/bspotvision/dropdowntabs/dropdowntabfiles/dropdowntabs.js' type='text/javascript'>
/***********************************************
* Drop Down Tabs Menu- (c) Dynamic Drive DHTML code library (www.dynamicdrive.com)
* This notice MUST stay intact for legal use
* Visit Dynamic Drive at http://www.dynamicdrive.com/ for full source code
***********************************************/
</script>
7. Next, you will need to paste the following section code right above: ]]></b:skin>
/* Drop Down Navigation
----------------------------------------------- */
.bluetabs{
border-bottom: 1px solid gray;
}
.bluetabs ul{
padding: 3px 0;
margin-left: 0;
margin-top: 1px;
margin-bottom: 0;
font: bold 12px Verdana;
list-style-type: none;
text-align: left; /*set to left, center, or right to align the menu as desired*/
}
.bluetabs li{
display: inline;
margin: 0;
}
.bluetabs li a{
text-decoration: none;
padding: 3px 7px;
margin-right: 3px;
border: 1px solid #778;
color: #2d2b2b;
background: white url(media/bluetab.gif) top left repeat-x; /*THEME CHANGE HERE*/
}
.bluetabs li a:visited{
color: #2d2b2b;
}
.bluetabs li a:hover{
text-decoration: underline;
color: #2d2b2b;
}
.bluetabs li.selected{
}
.bluetabs li.selected a{ /*selected main tab style */
background-image: url(media/bluetabactive.gif); /*THEME CHANGE HERE*/
border-bottom-color: white;
}
.bluetabs li.selected a:hover{ /*selected main tab style */
text-decoration: none;
}
/* ######### Style for Drop Down Menu ######### */
.dropmenudiv_b{
position:absolute;
top: 0;
border: 1px solid #918d8d; /*THEME CHANGE HERE*/
border-width: 0 1px;
font:normal 12px Verdana;
line-height:18px;
z-index:100;
background-color: white;
width: 200px;
visibility: hidden;
}
.dropmenudiv_b a{
width: auto;
display: block;
text-indent: 5px;
border: 0 solid #918d8d; /*THEME CHANGE HERE*/
border-bottom-width: 1px;
padding: 2px 0;
text-decoration: none;
color: black;
}
* html .dropmenudiv_b a{ /*IE only hack*/
width: 100%;
}
.dropmenudiv_b a:hover{ /*THEME CHANGE HERE*/
background-color: #edf3f3;
}
8. Before you save your template, preview it first to see if all section codes have been properly applied. If you can preview your blog, your codes have been properly applied, if you can’t, your codes are not properly applied.
9. Once you’re able to preview it, Save Template and switch over to Page Elements, under the Layout tab of your Blogger’s Dashboard. You should be able to see “Add a Gadget” under your header now.
10. Click “Add a Gadget” and select HTML and paste the following section code in the box: <div id="bluemenu" class="bluetabs">
<ul>
<li><a href="http://www.blogspotvision.com">Home</a></li>
<li><a href="http://www.blogspotvision.com" rel="dropmenu1_b">CSS</a></li>
<li><a href="http://www.blogspotvision.com" rel="dropmenu2_b">Partners</a></li>
<li><a href="http://www.blogspotvision.com">Tools</a></li>
</ul>
</div>
<!--1st drop down menu -->
<div id="dropmenu1_b" class="dropmenudiv_b">
<a href="http://www.blogspotvision.com">Horizontal CSS Menus</a>
<a href="http://www.blogspotvision.com">Vertical CSS Menus</a>
<a href="http://www.blogspotvision.com">Image CSS</a>
<a href="http://www.blogspotvision.com">Form CSS</a>
<a href="http://www.blogspotvision.com">DIVs and containers</a>
<a href="http://www.blogspotvision.com">Links and Buttons</a>
<a href="http://www.blogspotvision.com">Other</a>
</div>
<!--2nd drop down menu -->
<div id="dropmenu2_b" style="width: 150px;" class="dropmenudiv_b">
<a href="http://www.blogspotvision.com">CSS Drive</a>
<a href="http://www.blogspotvision.com">JavaScript Kit</a>
<a href="http://www.blogspotvision.com">Coding Forums</a>
<a href="http://www.blogspotvision.com">JavaScript Reference</a>
</div> <script type="text/javascript">
//SYNTAX: tabdropdown.init("menu_id", [integer OR "auto"])
tabdropdown.init("bluemenu")
</script>
11. Click “Save” and your template should now have Drop Down Menus.
*Tutorial Completed