Monday, November 30, 2009

$100 Google AdWords for you. For free.

adw Google AdWords is an online advertising program that allows anyone to advertise on Google.com and its network of partner websites. You can easily create ads that appear next to relevant search results on Google. When people click on your ad, they’re connected to your business. With this $100 at 25 cents CPC, you’re able to drive 400 – 600 new visitors to your website.

Starts: November 30, 2009 1:30AM
Ends: December 03, 2009 8:00PM


To qualify -


the first 70 w
ill have a chance to win $100 in
Google’s AdWords.


5
reasons to try Google AdWords:


  • It helps you connect with prospective customers who are searching for your business
  • Once your ad is set up with pay-per-click pricing, you only pay when someone clicks on your ad
  • You only show your ad where prospective customers are looking for you
  • You can use this $100 to test if AdWords works for your business
  • Potential customers are searching for what you offer right now


So what do you say? You have NOTHING to lose, but a lot to gain… and learn.
Saturday, November 28, 2009

A collection of web-development icons

WebAppers Web Application Icons Setweb-application-icons


  dl[18] preview[18]

Developpers Icons by Sekkyumudevicon

  dl[18] preview[18]

Web-Development Icons 


Web-Development_Icons Author: http://www.icojoy.com/ Zhebrakov Andrew (Andy-S)
Amount of icons: 60
Icon Sizes: 24X24
File Types: .png, .ico, .tif, .bmp
Colors: Colored with and without shadows, with a subtle gray shade and transparent.
Other Info: .bmp, .gif formats are optimized for lighter backgrounds.
  dl[18] preview[18]

Icons For Web Development
1244

  dl[18] preview[18]

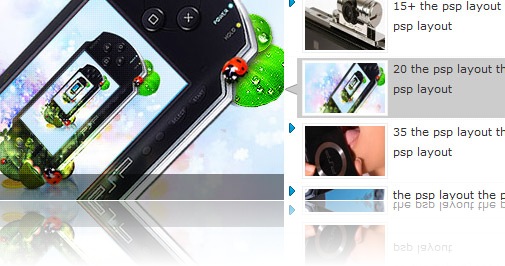
New Template: PSP All Day


psptemppost


  dl[18]  preview[18]

Friday, November 27, 2009

How to add a clean slick featured content slider to your Blogger using jQuery UI

FeaturedContentSliderjQuery This script allows you to display the most popular or most interesting content of your blog in a nice intuitive way for your readers. Featured contents are commonly displayed on the index or front page, enabling readers to instantly find the “good stuff” of your blog. Furthermore, it offers the ability to customize appearance and functionality.

Click here to see a demo

Steps to follow:

1. Login into your Blogger dashboard > Layouts > Edit HTML

2. Insert the following section code below into your template right before the section code: ]]></b:skin>

#featured{ 
width:400px; 
padding-right:250px; 
position:relative; 
height:250px; 
background:#fff; 
border:5px solid #ccc; 

#featured ul.ui-tabs-nav{
    position:absolute;
    top:0; left:400px;
    list-style:none;
    padding:0; margin:0;
    width:250px;
}
#featured ul.ui-tabs-nav li{
    padding:1px 0; padding-left:13px;
    font-size:12px;
    color:#666;
}
#featured ul.ui-tabs-nav li span{
    font-size:11px; font-family:Verdana;
    line-height:18px;
}

#featured .ui-tabs-panel{
    width:400px; height:250px;
    background:#999; position:relative;
        overflow:hidden;
}
#featured .ui-tabs-hide{
    display:none;
}

#featured li.ui-tabs-nav-item a{/*On Hover Style*/
    display:block;
    height:60px;
    color:#333;  background:#fff;
    line-height:20px;
    outline:none;
}
#featured li.ui-tabs-nav-item a:hover{
    background:#f2f2f2;
}
#featured li.ui-tabs-selected{ /*Selected tab style*/
    background:url('selected-item.gif') top left no-repeat;
}
#featured ul.ui-tabs-nav li.ui-tabs-selected a{
    background:#ccc;
}

#featured ul.ui-tabs-nav li img{
    float:left; margin:2px 5px;
    background:#fff;
    padding:2px;
    border:1px solid #eee;
}
#featured .ui-tabs-panel .info{
    position:absolute;
    top:180px; left:0;
    height:70px; width: 400px;
    background: url('transparent-bg.png');
}
#featured .info h2{
    font-size:18px; font-family:Georgia, serif;
    color:#fff; padding:5px; margin:0;
    overflow:hidden;
}
#featured .info p{
    margin:0 5px;
    font-family:Verdana; font-size:11px;
    line-height:15px; color:#f0f0f0;
}
#featured .info a{
    text-decoration:none;
    color:#fff;
}
#featured .info a:hover{
    text-decoration:underline;
}

Note: The above code references the external .png and .gif file "transparent-bg.png", "selected-item.gif”, which you need to download (right click, and select "Save As").

3. Next, insert the following section code below right after the section code: ]]></b:skin>

<script src='http://ajax.googleapis.com/ajax/libs/jquery/1.3.2/jquery.min.js' type='text/javascript'/>

<script src='http://ajax.googleapis.com/ajax/libs/jqueryui/1.5.3/jquery-ui.min.js' type='text/javascript'/>

<script type='text/javascript'>
    $(document).ready(function(){
        $(&quot;#featured &gt; ul&quot;).tabs({fx:{opacity: &quot;toggle&quot;}}).tabs(&quot;rotate&quot;, 5000, true);
    });
</script>

4. Navigate over to Layout > Page Elements to “Add a Gadget” and paste the following section code into the box

<div id="featured">
          <ul class="ui-tabs-nav">
            <li id="nav-fragment-1" class="ui-tabs-nav-item ui-tabs-selected"><a href="#fragment-1"><img alt="" src="/image1-small.jpg"/><span>15+ Excellent High Speed</span></a></li>
            <li id="nav-fragment-2" class="ui-tabs-nav-item"><a href="#fragment-2"><img alt="" src="/image2-small.jpg"/><span>20 Beautiful Long Exposure</span></a></li>
            <li id="nav-fragment-3" class="ui-tabs-nav-item"><a href="#fragment-3"><img alt="" src="/image3-small.jpg"/><span>35 Amazing Logo Designs</span></a></li>
            <li id="nav-fragment-4" class="ui-tabs-nav-item"><a href="#fragment-4"><img alt="" src="/image4-small.jpg"/><span>Create a Vintage</span></a></li>
          </ul>

        <!-- First Content -->
        <div id="fragment-1" style="" class="ui-tabs-panel">
            <img alt="" src="/image1.jpg"/>
             <div class="info">
                <h2><a href="#">15+ Excellent High Speed</a></h2>
                <p>Lorem ipsum dolor sit amet, consectetur adipiscing elit. Nulla tincidunt condimentum lacus. Pellentesque ut diam....<a href="#">read more</a></p>
             </div>
        </div>

        <!-- Second Content -->
        <div id="fragment-2" style="" class="ui-tabs-panel ui-tabs-hide">
            <img alt="" src="/image2.jpg"/>
             <div class="info">
                <h2><a href="#">20 Beautiful Long Exposure</a></h2>
                <p>Vestibulum leo quam, accumsan nec porttitor a, euismod ac tortor. Sed ipsum lorem, sagittis non egestas id, suscipit....<a href="#">read more</a></p>
             </div>
        </div>

        <!-- Third Content -->
        <div id="fragment-3" style="" class="ui-tabs-panel ui-tabs-hide">
            <img alt="" src="/image3.jpg"/>
             <div class="info">
                <h2><a href="#">35 Amazing Logo Designs</a></h2>
                <p>liquam erat volutpat. Proin id volutpat nisi. Nulla facilisi. Curabitur facilisis sollicitudin ornare....<a href="#">read more</a></p>
             </div>
        </div>

        <!-- Fourth Content -->
        <div id="fragment-4" style="" class="ui-tabs-panel ui-tabs-hide">
            <img alt="" src="/image4.jpg"/>
             <div class="info">
                <h2><a href="#">Create a Vintage</a></h2>
                <p>Quisque sed orci ut lacus viverra interdum ornare sed est. Donec porta, erat eu pretium luctus, leo augue sodales....<a href="#">read more</a></p>
             </div></div></div>

Note: The above code references the external .jpg file "image4.jpg", "image2.jpg”, “image3.jpg”, “image1.jpg”, “image4-small.jpg”, “image3-small.jpg”, “image2-small.jpg”, “image1-small.jpg”, which you need to download (right click, and select "Save As").

Configuration

If you want to enable pausing the slideshow on hover, simply add the following section code below instead of the one above in steps 3.

$(document).ready(function(){
$("#featured").tabs({fx:{opacity: "toggle"}}).tabs("rotate", 5000, true);
$("#featured").hover(
function() {
$("#featured").tabs("rotate",0,true);
},
function() {
$("#featured").tabs("rotate",5000,true);
}
);
});

**Tutorial completed

Thursday, November 26, 2009

How to add page numbers to Blogger posts

blogger-page-navigation.jpg This script replaces the default blog pager (links to newer, older, and home pages) with numbered page navigation, enabling readers to navigate deeper into the archives with ease, compared to the “newer” and “older” navigation links. Furthermore, it offers the ability to customize the number of page links and the number of posts displayed on each page.

Scroll down to view a demo

1. Login into your Blogger dashboard > Layouts > Edit HTML

2. Insert the following section code below into your template right before the section code: ]]></b:skin>

/*Page Navi Styles start */
.showpageArea a {
text-decoration:underline;
}
.showpageNum a {
border:1px solid #CCCCCC;
margin:0 3px;
padding:3px 7px;
text-decoration:none;
}
.showpageNum a:hover {
background-color:#CCCCCC;
border:1px solid #CCCCCC;
}
.showpagePoint {
-moz-background-clip:border;
-moz-background-inline-policy:continuous;
-moz-background-origin:padding;
background:#CCCCCC none repeat scroll 0 0;
border:1px solid #CCCCCC;
color:#333333;
margin:0 3px;
padding:3px 7px;
text-decoration:none;
}
.showpageOf {
margin:0 3px 0 0;
padding:3px 7px;
text-decoration:none;
}
.showpage a {
border:1px solid #CCCCCC;
padding:3px 7px;
text-decoration:none;
}
.showpage a:hover {
text-decoration:none;
}
.showpageNum a:link, .showpage a:link {
color:#333333;
text-decoration:none;
}
/*Page Navi styles end*/

4. Next, you will need navigate over to Layout > Page Elements to “Add a Gadet”. Select HTML/JavaScript and copy and paste the following section code into the box.

<!--Page Navigation Starts-->
<script type="text/javascript">
var pageCount=5;
var displayPageNum=5;
var upPageWord ='Previous';
var downPageWord ='Next';
</script>
<script src="blogger-page-navi.v1.js" type="text/javascript"></script>
<!--Page Navigation Ends—>


Note: The above code references the external .js file "blogger-page-navi.v1.js", which you need to download (right click, and select "Save As").

Configuration

var pageCount is the number of links to display after page 1
var displayPageNum is the number of posts to be displayed on each link
var upPageWord is the previous link (you can change the wording)
var downPageWord the next link (you can change the wording)

Wednesday, November 25, 2009

How to add a site logo/watermark to your Blogger

staticlogo2This is a site logo/watermark script that allows you to display a static image at any of the four corners of the browser, never going out of sight. This can be useful for branding purposes, or just to offer your readers an easy way to jump back to your site’s homepage with a click of a button. The logo can also be set to disappear after X seconds.

Click here to see the demo

1. Login into your Blogger dashboard > Layouts > Edit HTML

2. Insert the following section code below into your template right before the closing of head. </head>

<script type="text/javascript" src="http://ajax.googleapis.com/ajax/libs/jquery/1.3.2/jquery.min.js"></script>

<script type="text/javascript" src="staticlogo.js">
/*********************************************
* Site Logo script- © Dynamic Drive DHTML code library (www.dynamicdrive.com)
* This notice MUST stay intact for legal use
*********************************************/
</script>

Note: The above code references the external .js file "staticlogo.js", which you need to download (right click, and select "Save As").

Configuration

The section code is taken from the staticlogo.js file, you should configure the following if you want to customize your logo/watermark.

setting: {orientation:4, visibleduration:20000, fadeduration:[1000, 500]}, //orientation=1|2|3|4, duration=millisec, fadedurations=millisecs offsets: {x:10, y:10},//offset of logo relative to window corner logoHTML: '<a title="Blogspot Vision" href=http://www.blogspotvision.com><img style="border-right-width: 0px; width: 50px; border-top-width: 0px; border-bottom-width: 0px; height: 47px; border-left-width: 0px" src="logo.gif" /></a>', //HTML for logo, which is auto wrapped in DIV w/ ID=&quot;mysitelogo&quot;

Note: Most of them are fairly self explanatory. For setting.orientation, it sets the orientation of the logo relative to the window edge, and should an integer from 1 to 4 (1=top left corner, 2=top right corner, 3=bottom left corner, 4=bottom right corner). The option setting.visibleduration sets the duration (in milliseconds) before the logo disappears. For perpetual, enter 0 instead.

** Tutorial completed

Tuesday, November 24, 2009

How to add a digital clock to your Blogger

dc This digital clock script attempts to mimic that cool “glow in the dark” look of a LCD watch when it comes to its interface. This clock can also display the time in standard 12-hour format, with a “AM” and “PM” indicator. Note that in non IE4+/NS6+ browsers, a regular form clock is displayed instead.

Click here to see the demo

Steps to follow:

1. Login into your Blogger dashboard > Layouts > Edit HTML

2. Insert the following section code below into your template right before the closing of head. </head>


<style>
<!--
.styling{
background-color:black;
color:lime;
font: bold 15px MS Sans Serif;
padding: 3px;
}
-->
</style>
3. Next, go to Layouts > Page Elements > and Add an HTML/JavaScript Gadget. Insert the following section code below as the HTML and after saving, move the gadget where you want the calendar to appear.

<span id="digitalclock" class="styling"></span>
<script>
<!--
var alternate=0
var standardbrowser=!document.all&&!document.getElementById

if (standardbrowser)
document.write('<form name="tick"><input type="text" name="tock" size="6"></form>')

function show(){
if (!standardbrowser)
var clockobj=document.getElementById? document.getElementById("digitalclock") : document.all.digitalclock
var Digital=new Date()
var hours=Digital.getHours()
var minutes=Digital.getMinutes()
var dn="AM"

if (hours==12) dn="PM"
if (hours>12){
dn="PM"
hours=hours-12
}
if (hours==0) hours=12
if (hours.toString().length==1)
hours="0"+hours
if (minutes<=9)
minutes="0"+minutes

if (standardbrowser){
if (alternate==0)
document.tick.tock.value=hours+" : "+minutes+" "+dn
else
document.tick.tock.value=hours+"   "+minutes+" "+dn
}
else{
if (alternate==0)
clockobj.innerHTML=hours+"<font color='lime'>&nbsp;:&nbsp;</font>"+minutes+" "+"<sup style='font-size:1px'>"+dn+"</sup>"
else
clockobj.innerHTML=hours+"<font color='black'>&nbsp;:&nbsp;</font>"+minutes+" "+"<sup style='font-size:1px'>"+dn+"</sup>"
}
alternate=(alternate==0)? 1 : 0
setTimeout("show()",1000)
}
window.onload=show

//-->
</script>

** Tutorial completed

Monday, November 23, 2009

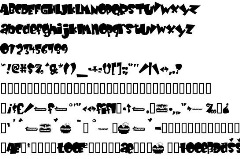
Top 7 weekly fonts

1. anglo te.0.1 anglo_te.0.2
anglo_te.0.1  

dl preview


babykruf.0.2
2. babykruf.0.1 
babykruf.0.1

dl preview


3. bloodofd.0.1 bloodofd.0.2
bloodofd.0.1  

dl preview


4. chi_ttf.0.1 chi_ttf.0.2
chi_ttf.0.1
dl preview


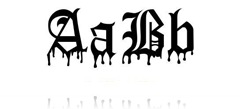
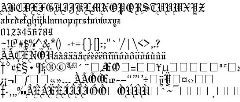
5.  oldeengl.0.1 oldeengl.0.2
oldeengl.0.1
dl preview


6. sabrina.0.1 sabrina.0.2
sabrina.0.1
dl preview


7. sadfilms.0.1 sadfilms.0.2
sadfilms.0.1
dl preview


Sunday, November 22, 2009

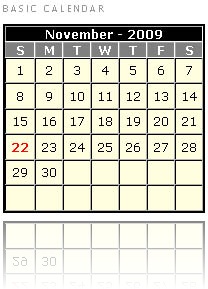
How to add a basic calendar to your Blogger

calendarbv If you need a simple, elegant calendar to display the current days of the month, Basic Calendar is an excellent script for the purpose. Uses CSS to allow easy changing to its appearance, everything from calendar dimensions, colors, down to the font used to highlight the current day.

Click here to see the demo

Steps to follow:

1. Login into your Blogger dashboard > Layouts > Edit HTML

2. Insert the following section code below into your template right before the closing of head. </head>

<style type="text/css">
.main {
width:200px;
border:1px solid black;
}
.month {
background-color:black;
font:bold 12px verdana;
color:white;
}
.daysofweek {
background-color:gray;
font:bold 12px verdana;
color:white;
}
.days {
font-size: 12px;
font-family:verdana;
color:black;
background-color: lightyellow;
padding: 2px;
}
.days #today{
font-weight: bold;
color: red;
}
</style>
<script type="text/javascript" src="basiccalendar.js">
</script>

Note: The above references an external .js file. Download basiccalendar.js (by right clicking, and selecting "Save As"), and upload to your webpage directory.


Note: Within the above code, you may customize the CSS rules to change all visual aspects of the calendar.

3. Next, go to Layouts > Page Elements > and Add an HTML/JavaScript Gadget. Insert the following section code below as the HTML and after saving, move the gadget where you want the calendar to appear.


<script type="text/javascript">

var todaydate=new Date()
var curmonth=todaydate.getMonth()+1 //get current month (1-12)
var curyear=todaydate.getFullYear() //get current year

document.write(buildCal(curmonth ,curyear, "main", "month", "daysofweek", "days", 1));
</script> 

** Tutorial completed

Saturday, November 7, 2009

How to install font packets to Windows

text_page Fonts add style to your blog and can be appealing to your readers. Fonts can even make graphic design a lot easier and can save a good amount of time when you’re trying to produce multiple templates in a short amount of time. To install downloaded font packets to Windows for your use, start off by downloading font packets. You can find fonts anywhere online and in our fonts section.

Steps to follow:

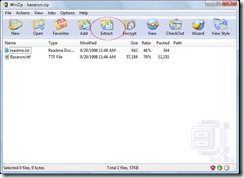
1. Once you’ve downloaded the font packets to your computer, you will need to use WinZip to extract it’s files to your Fonts folder in Windows.

installfonts 
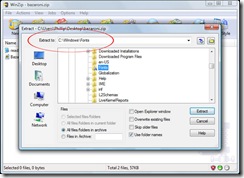
2. Extract all files to your Windows fonts folder. Windows fonts folder are usually located at C:\Windows\Fonts

installfonts2
3. After you’ve extracted all files to the Windows fonts folder, you should be able to start using this type of font anywhere on your computer where fonts are contained. For example, the font packet extracted above is bazaroni. This font can now be used in photoshop, word, etc.

** Tutorial completed.